
Honestly, this is the easiest way to cook a large piece of meat to high-end restaurant quality. Simply said, sous vide tri tip, you cannot mess it up. The best part is that it will turn out the same every time you decide to sous vide up some Tri-Tip Beef.

⬇️ Table of Contents
🔪 Preparation of Sous Vide Tri-Tip
- Start by inspecting the Tri-Tip Beef. Look for silver skin on the surface of the meat. Identifying silver skin: Looks smooth and has long-running strands running back and forth in a linear line.
- If you find silver skin, cut it all off. To remove it, use a knife to make a small cut underneath the silver skin on one end where it begins. Cutaway from yourself making small movements back and forth until the piece has been removed.


- Your local butcher can help you with removing any silver skin, just ask them.
- If you find a large amount of fat. Trim some of it away. You do not need to remove 100% because fat is flavor and the small amount of fat will render/melt over the long cooking time.


Photo of Tri-Tip Beef from Whole Food Market. The butcher often leaves the full-fat cap on because the fat cap is a pure flavor.

Photo of Tri-Tip fat cap mostly cut away and removed. Be sure to leave a little bit of the fat for an extra flavor boost.

🧂 Tri Tip Sous Vide Seasoning Technique
I have a huge piece of advice when it comes to sous vide cooking and seasoning. That advice would be that you do not season sous vide meats like usual.
For example, adding salt straight to the Tri-Tip, then straight into the sous vide bag is a major error. The meat will end up being salt-flavor-forward and permeate the meat all the way through. Salt is a flavor enhancer, not the desired flavor.
We need to do a quick salt cure on the Tri-Tip. Which is very easy and does not take long to complete.
- Measure out the salt into a side bowl. I like using different types of salt together to create a special enhanced seasoning experience. Salt ideas, Himalayan sea salt, black Hawaiian lava salt. I have links to salts for purchase in the recipe card below.

- Rub all of the salt all over the Tri-Tip. Allow the salt to "cure" for 15 minutes.
- What the Tri-Tip will look like when it's ready. You'll notice the layer of moisture from the salt. Osmosis has occurred. Water was removed and salt has moved in.
- After 15 minutes remove all the salt under running water. Make this process quick. Only wash off the salt, do not allow the water to soak into the Tri-Tip.

- Place the Tri-Tip into a large plastic sous vide bag. (Sous Vide Bag: a temperature safe bag.)
- I like adding a small bit of Lea & Perrins Worcestershire sauce. Around 1 tablespoon. The idea is to not add too much.
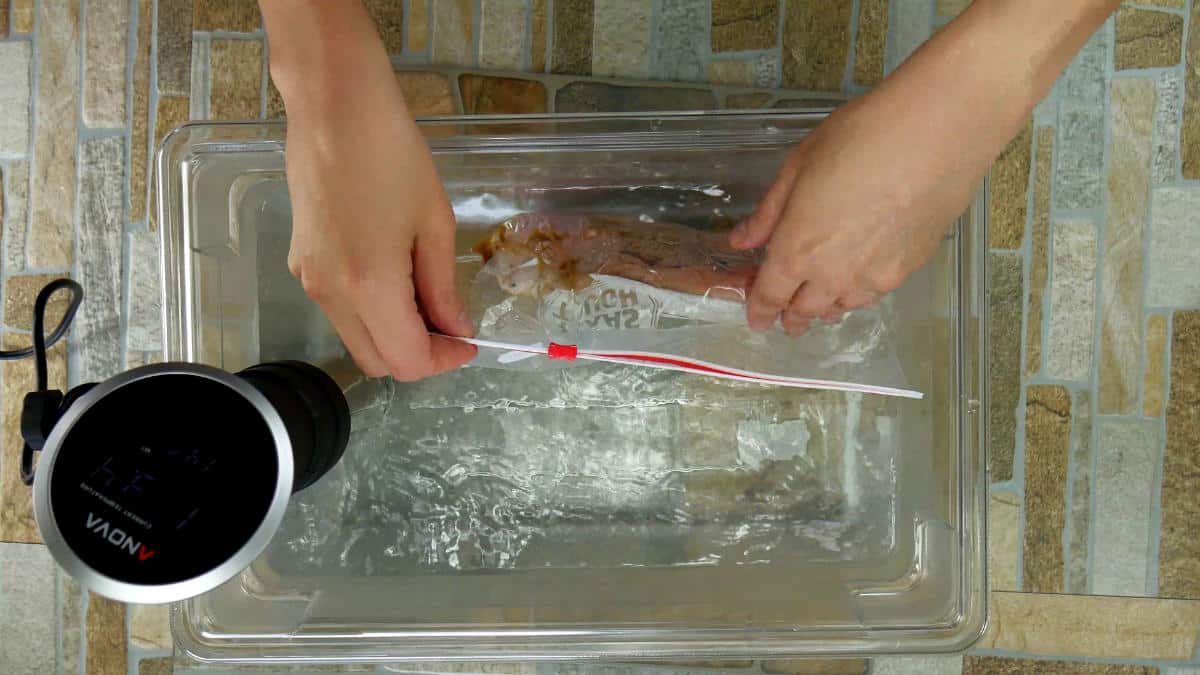
- Lower the sous vide bag into the water tub to remove the air from the bag. As the bag lowers the air will be forced out.
- Secure the sous vide bag to the end of the temperature-safe sous vide tub with a clip. When the sous vide machine is on it circulates the water around the water tub. I do this so the sous vide bag does not move around in the sous vide tub and end up right next to the heating element of the sous vide machine, which is hot.
- Set the sous vide machine temperature to 132 degrees and a timer for 8 hours. After 8 hours turn down the machine temperature to 125 for the remainder of the 24-hour sous vide cook. Information of why below to turn down to 125 degrees on the recipe card.
- The last step is optional. If you would like to increase the presentation of the Tri-Tip, sear it off in a hot cast-iron skillet. Be sure to use a high smoke point oil like peanut oil. The sear is only to add color to the outside and will add a boost of heat through the dish, which I like before serving.


Reveal - Slicing
TIP: Make sure you cut across the grain. Look closely on the Tri-Tip and you'll see long lines(the grain) running one way or the other. Place your knife against the grain at 90 degrees and cross across the line (the grain).

The finished Tri-Tip has a beautiful texture and mouthfeel. The first time I tried this, the first thought was wow this is like a prime rib roast. Which can be an expensive selection of beef.
Take a look at our "Poor Mans Prime Rib", 24 hours hit the mark of perfection. The elasticity, the stretch is used in BBQ competitions to judge brisket. Yep, we pass the test with flying colors.

💭 FAQS
Will This Sous Vide Technique work on other cuts of Beef?
What happens if the Tri-Tip cooks longer than 24 hours?
Can I smoke the Tri-Tip after the Sous Vide machine hits 24 hours?
📖 Recipe

24 Hour Sous Vide Tri-Tip
Suggested Equipment
Ingredients
SALT: Quick Salt Cure Using 3 Salts
- 2 tablespoon Kosher Salt
- 2 tablespoon Black Hawaiian Sea Salt
- 2 tablespoon Himalayan Sea Salt
1 SALT: Quick Salt Cure Using 1 Salt
- 6 tablespoon Kosher Salt
The BEEF
- 1 large Tri-Tip Beef Roast At least 1 pound - 16oz - larger better
Instructions
Perform The Salt Cure
- This step is very important. If you are new to sous vide cooking this tip will be helpful with all your future sous vide cooks. The whole point is to make the meat flavorful and not salty. TIP: When you add salt straight to the meat that will be sous vide cooked. Using a normal seasoning practice on the meat often ends up salty. This isn't due to the amount of salt, but due to the salt permeating the piece of meat. The FIX: Salt Cure Your Meat
- Process: Take a small bowl and add all of the salt and mix well. Next, spread all of the salt all over the Tri-Tip Beef. Set a timer for 15 minutes.
- After 15 minutes rinse all of the salt off under running cold water. You only need to rinse the salt off. Do not soak or allow the water to get into the meat. Rinse the salt off quickly. 10 seconds.
Sous Vide Tri-Tip Step by Step
- 1) Salt sure the Tri-Tip
- 2) Rinse off the Tri-Tip quickly underwater
- 3) Place the Tri-Tip into temperature-safe sous vide bag (I use ziplock freezer bags) Another option is using a food saver to seal the meat. (Product purchase listed above)
- 4) Set up the sous vide machine water tub. Fill it up to the max level line due to the long cook time. Evaporation will occur. Depending on your sous vide water tub you might need to add some water in the middle of the cook. Just be aware that could be needed.
- 5) Set the temperature to 132 degrees and turn on the sous vide machine. (You will know the machine is on when the water starts circulating.
- 6) Sealing the Tri-Tip bag. To seal, lower the bag into the water. The water will force the air out if using a freezer bag. Once the top of the bag is lowered then seal, close the bag.A saver machine will remove the air for you.
- After 8 hours in the sous vide lower the temperature down to 125 degrees for the remaining of the cooking time.Why? Think of it as a long rest time. The meat will be "cooked" at this point, but we want the meat to become even more tender. That is why you lower the temperature to 125 for the remaining hours. It's like a long rest on the meat.
Video

Notes
- Inspect the Tri-Tip
- Remove any silver skin
- Cutaway excess fat, but try to leave some for flavor
- Perform the quick salt cure (see notes in the article)
- Rinse off the salt (quickly)
- Place Tri-Tip in temperature safe bag, or food saver bag
- Remove the air from the bag (see above article)
- Place the Tri-Tip in the sous vide machine
- Secure the meat to the side of the water rub, 0pposite side away from the sous vide machine
- Set machine temperature to 132 degrees for the first 8 hours
- After 8 hours turn down the temperature to 125 for the additional 16 hours
- Once the timer is up you can serve. No need to allow the meat to rest.
- after 8 hours the meat is essentially cooked, but not as tender as it could be
- the additional 16 hours, think of it as a long rest of the meat. The meat is relaxing and tenderizing
- you can keep the temperature at 132 degrees the entire time if you like, the meat will still turn out great
Chimichurri Sauce
Ingredients:
- Fresh parsley - 1 cup, finely chopped
- Fresh oregano - 2 tablespoons, finely chopped (or 2 teaspoons of dried oregano)
- Garlic - 3 to 4 cloves, minced
- Red wine vinegar - ¼ cup
- Olive oil - ½ cup
- Red chili flakes - 1 teaspoon (adjust to taste)
- Salt and pepper - to taste
Instructions:
- Combine Herbs & Garlic: In a bowl, mix the finely chopped parsley and oregano with the minced garlic.
- Add Liquids: Pour in the red wine vinegar and olive oil. Stir well to combine.
- Season: Add the red chili flakes, salt, and pepper. Adjust these to suit your taste preferences.
- Mix Thoroughly: Ensure everything is well combined. The sauce should have a somewhat chunky yet cohesive consistency.
- Let It Rest: Allow the sauce to sit for at least 10 minutes before serving. This resting period lets the flavors meld beautifully.
- Serve or Store: Use immediately, or store in the refrigerator for up to a week. The flavor deepens over time.
Horseradish Cream Sauce
Ingredients:
- Fresh parsley - 1 cup, finely chopped
- Fresh oregano - 2 tablespoons, finely chopped (or 2 teaspoons of dried oregano)
- Garlic - 3 to 4 cloves, minced
- Red wine vinegar - ¼ cup
- Olive oil - ½ cup
- Red chili flakes - 1 teaspoon (adjust to taste)
- Salt and pepper - to taste
Instructions:
- Combine Herbs & Garlic: In a bowl, mix the finely chopped parsley and oregano with the minced garlic.
- Add Liquids: Pour in the red wine vinegar and olive oil. Stir well to combine.
- Season: Add the red chili flakes, salt, and pepper. Adjust these to suit your taste preferences.
- Mix Thoroughly: Ensure everything is well combined. The sauce should have a somewhat chunky yet cohesive consistency.
- Let It Rest: Allow the sauce to sit for at least 10 minutes before serving. This resting period lets the flavors meld beautifully.
- Serve or Store: Use immediately, or store in the refrigerator for up to a week. The flavor deepens over time.
📋 Related Recipes To Try
TRADITIONAL TEXAS SMOKED PRIME RIB

TEXAS PEPPER BEEF JERKY


Susan Zagorach says
This is a WINNER! Any suggestions on similar cook but with venison tenderloin?
Steven Pennington says
Hi Susan! First thanks for the idea. Venison in the sous vide would be excellent. Something makes me think around 4 hours would be right on point. For me, I would shoot for medium rare for max tenderness. A temperature of 125 to 130. Enjoy
Sparks says
Tried this tonight and all I can say is, "I'm a believer!" I've cooked sous-vide style for a couple of years and this took things to another level. Fork-tender tri-tip, finished under the broiler for 4 minutes with a dash of Ms. Ruben's seasoning. Definitely looking at your other recipes.
Steven Pennington says
Thanks for the feedback. My first time was a shock. Love using this technique. It's almost too easy