
Are you looking for the best way to cook ribs? Look no further than sous vide pork ribs! This cooking method involves sealing your food in a plastic bag and then cooking it in a water bath at a consistent temperature. This ribs recipe results in evenly cooked, succulent food that is full of flavor.
Pork ribs are an excellent option to use sous vide because they're slow-cooked at a low temperature. This allows more time for the meat to break down and tenderize, resulting in perfectly fall off the bone tender results.
⬇️ Table of Contents
- What Is Sous Vide Cooking Ribs?
- How Long Should I Cook Sous Vide Ribs?
- Are Sous Vide Ribs Different From Traditionally Cooked Ribs?
- 💭 Instructions
- 🎥 Watch How To Make
- What's The Difference Between Pork Spare Ribs and Baby Back Ribs?
- What Happens If The Temperature Is Not Turned Down To 130?
- Can You Sous Vide Frozen Ribs?
- 📖 Recipe
If you have never tried sous vide ribs, you're missing out on one of the best culinary experiences. There is nothing quite like it with perfectly cooked ribs that are fall-off-the-bone tender, cooked low, and slow in a temperature-controlled water bath for 12 to 48 hours.
What Is Sous Vide Cooking Ribs?
Sous vide (pronounced (/suːˈviːd/;) is a cooking technique that involves vacuum-sealing food in a plastic pouch and then slowly cooking it in sous vide water bath.
The water bath is set to a temperature much lower than the standard boiling point of water, allowing the food to cook slowly and evenly. This results in dishes cooked to perfection, with no risk of overcooking.
Sous vide is a French term that translates to "under vacuum." This cooking method was first developed in the 1970s but has only gained popularity in recent years. It is now a common cooking method used by chefs all over the world.
How Long Should I Cook Sous Vide Ribs?
There is no definitive answer to how long to cook sous vide ribs, as it depends on various factors such as the thickness of the ribs, the type of ribs, and desired tenderness. I like making sous vide baby back ribs for this cooking method verse using spare ribs.
However, a general rule is to cook them for at least 12 hours if you want fall-off-the-bone ribs. If you're looking for something less tender, you can cook them for shorter periods. Experiment and find what works best for you.
Cooking ribs for at least 24 hours in a sous vide machine, after cooking, the ribs can be grilled, broiled, or baked to give them a crispy finish.

Are Sous Vide Ribs Different From Traditionally Cooked Ribs?
Sous vide machines cook food in sealed bags using precise temperature control. This method of cooking ribs results in very tender, juicy ribs that differ from traditionally cooked ones.
The main advantage of sous vide cooking is that it allows for a consistent outcome; every rib will be perfectly cooked to the same level of doneness.
Spare Ribs are the most common type to be cooked sous vide, but any rib can be cooked using this method. To cook sous vide ribs, you will need to first remove the membrane from the back of the ribs and then coat them with your desired seasonings.
Once the ribs are seasoned, they can be placed in a sealed bag and cooked in a sous vide machine for several hours. Once they are finished cooking, they can be grilled or smoked for added flavor.
💭 Instructions
When shopping for ribs, you can use any variety of ribs you enjoy; even beef or lamb ribs work. I suggest shopping at your local butcher shop; it's a great way to support your community and find some excellent cuts of pork.
Step #1:
To start, rinse the ribs under cold water. Always rinse the ribs off under cold water before preparing them.
🔪 Removing The Rib Membrane
When cooking ribs, you want to remove the membrane from the back of the ribs. I like using the end of a spoon to work my way underneath the membrane, starting on the edge and working inward to get a grip. Once you get a piece exposed, use a paper towel to grip and pull the membrane right off.

Types of Ribs
Purchase the meatiest ribs with the thickest sides - No one wants a skinny rib.
Inspect the ribs next. Cut off anything that looks out of place. Look for fat pieces on the upper and underside that should be cut off.
- Spare ribs come from the pork belly and are the most popular type of pork rib.
- Baby back ribs are from the loin and are the most tender type of ribs.
- St. Louis-style ribs are meatier and less tender than other types of ribs.
- Ribs can be cooked in a variety of ways, but the sous vide method is the most tender and easiest way to cook them.
- Seasoning your ribs with a dry rub is the best way to enhance their flavor. A great pork ribs recipe needs a good dry rub.
Two Types of Sous Vide Bags:
- Use a food saver machine to seal and remove the air.
- Use Ziploc freezer bags. They are cheaper and work very well. No machines are needed to remove the air from the bag.
Proceed by dividing each rack of ribs in half. I like cutting them on the backside. It is easier to see what you are cutting into. #safe

Place the ribs in a large Ziploc bag or use a food saver machine and seal them, removing the air. Season the ribs before sealing.

Season the ribs with your favorite dry rub - I like the 2 Gringo's Chupacabra Dry Rub and adding a little bit of soy sauce.

Machine Settings
To begin with, set the sous vide machine temperature to 140 degrees. Then press the "ON" button. The water will begin to circulate, and the temperature will increase.
The machine takes a while to heat up. I like getting hot water from the bathtub. Our water is around 130 degrees out of the facet.
Ribs cooked at a higher temperature result in tougher ribs unless par-cooking them, which can be done at higher sous vide temperatures. An example where this makes sense would be the higher temperature for a short period, then finished in a deep fryer.

Removing The Air From The Sous Vide Bags
Ziploc bag while holding the bag upright, lower it into the water, making sure to keep the opening away from the water. As the bag submerges, the air is pushed out. Once the air is out, close/seal the bag. Then, lower the ribs in the water bath.
You can watch the process here: Short video - Click To Watch

Secure the bags to the opposite side, away from the sous vide machine, with a clip. This ensures the bag will not come into contact with the sous vide machine motor/heating element. It is possible the bag could break open and fill with water.

Sous vide the ribs for 8 hours, then turn the temperature down to 130 degrees for another 48 hours.

You can cook the ribs for 12 hours, 24 hours, 36 hours, or 48 hours. They all work well. The longer cooking time equals a more tender rib.
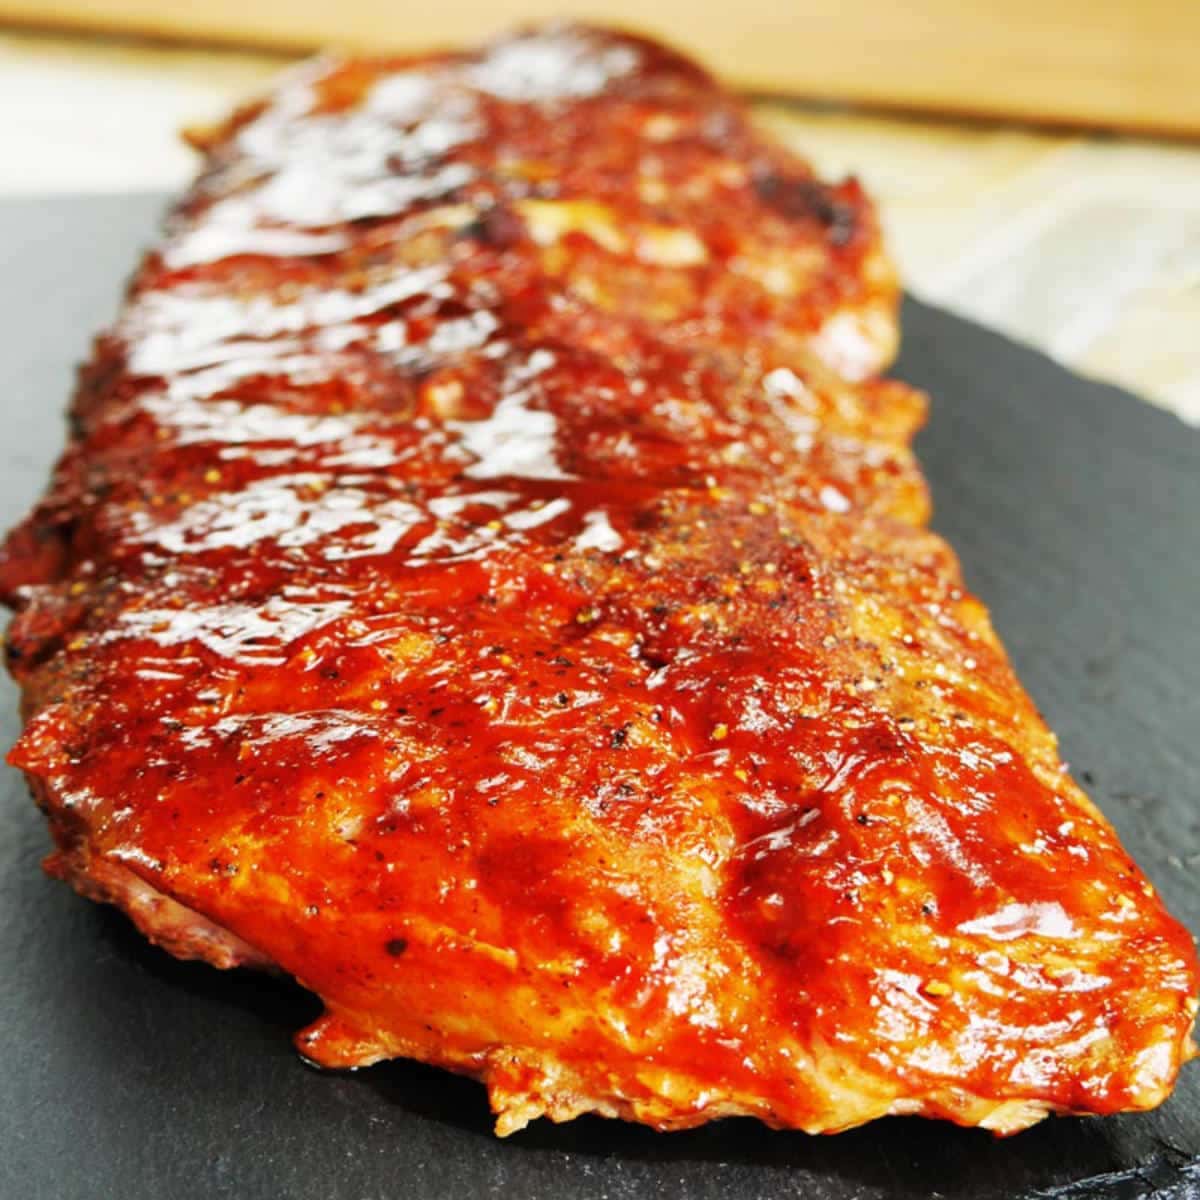
Broiling The Ribs
Remove ribs from the sous vide, then placed them on a roasting rack and brush ribs with a layer of your favorite bbq sauce, possibly adding liquid smoke to intensify the barbecue ribs feel and smokiness.
Transfer ribs to the oven and cook for 5 to 10 minutes. This will depend on your oven and desired doneness.
🎥 Watch How To Make

What's The Difference Between Pork Spare Ribs and Baby Back Ribs?
Pork spare ribs are the larger, meatier ribs taken from the belly area of the pig. Baby back ribs are smaller and more tender, coming from the loin area near the spine. Both types of ribs can be cooked using similar methods, but spare ribs will usually take longer to become tender.
Tender sous vide baby back ribs for the win!
What Happens If The Temperature Is Not Turned Down To 130?
The ribs will end up fine.
Lowering the temperature acts as a long meat "resting" period for the meat.
While at 130 degrees, the ribs will become very tender.
Can You Sous Vide Frozen Ribs?
You can sous vide frozen ribs, but it will take longer to cook them. Pork ribs are the most common type of rib to cook sous vide, but you can also cook beef or lamb ribs this way.
The cook time for frozen pork ribs will be about twice as long as for fresh pork ribs. When cooking ribs sous vide, you'll want to make sure they reach an internal temperature of 140 degrees Fahrenheit.
Posts To Visit
45 Types of Peppers | A to Z | Defined| Photos
New Crispy Pork Belly Technique: Perfect Every Time!
Hatch Chile | Seasons | Uses | Recipes
Award-Winning Texas Chili Recipe
Types of Sweet Potatoes | A to Z | Photos
📖 Recipe

Sous Vide Ribs
Suggested Equipment
Ingredients
- 1 Rack Baby Back Ribs 0r Spare Ribs
- 4 Tablespoons Dry Rub Signup for our newsletter to receive our secret BBQ Dry Rub
- 3 Tablespoons Soy Sauce
- 1 Tablespoon Sea Salt
Instructions
How To Make Sous Vide Ribs
- Fill a large temperature-safe water tub 80%.Secure the sous vide machine to the temperature-safe tub. (see machine manual)Set the temperature to 140 degrees and turn the machine on. Tip: The machine is on when the water begins to circulate.

- Rib preparation: Start by rinsing the ribs off under cold water. Pat them dry with a paper towel. Inspect the ribs and cut off anything that looks out of place. Fat hanging, etc.Check and see if the membrane has been removed.The membrane is the silver skin on the underside of the ribs.
- Removing the rib membrane: use the back of a spoon handle. Position it underneath the membrane right by the edge of a rib. Move/position it underneath the surface of the membrane. Then grab a paper towel get a grip on the membrane and pull it back away from the rack of ribs.
- Season the ribs: season the ribs once you get them in the bag. You'll waste nothing this way. Then close the bag and shake.I do not encourage adding liquid smoke to the bags as it is very strong ingredient. You can add a small amount to your bbq sauce.
- Sealing the ribs: two options.1) use a food saver machine and seal and remove the air.2) place the ribs in freezer zip lock bags. With the bag open, lower the bags into the water bath making sure zero water enters the bag.The air in the bag will leave the bag from the pressure of the water. Once the air is removed, seal the bag.
- Secure the bag using a clip to the end of the temperature-safe tub. Secure the bags to the opposite end away from the machine.
- Key step: after 8 hours, lower the temperature to 130 degrees from 140 degrees.Cook for an additional 12 hours. Or so, you can easily do 12 hours, 18 hours, 24 hours, 36 hours, 48 hours. No problem.
- Finishing The Ribs: To finish the ribs, place them on a roasting rack. Paint on some of your favorite BBQ sauce and place the ribs under the broiler and give the ribs additional texture. The caramelizing of the BBQ sauce is one of the best parts.

Video
Notes
- Be sure to remove the rib membrane, or risk having a chewy rib on the meat next to the bone on the bottom half.
- If you season the ribs aggressively the ribs will taste over powered and the flavor of pork ribs will be lost. You can always add more season after the sous vide cook. I like adding BBQ sauce and putting the ribs on the smoker for a while to get some smoke flavor.
- Putting the ribs under the broiler in the oven with BBQ sauce to get some texture. Keep an eye on the ribs. The sugar in the BBQ sauce wants to caramelize, but will burn very fast. Takes about 5 to 7 minutes. I keep the oven cracked so I can see what's happening. The BBQ sauce will start to bubble and begin to brown. Stop short of over browning and becoming burnt.


Shelly says
I made the 48 hour ribs over Memorial Day weekend and thought they might be the best ribs I have ever eaten. I have been to many great rib joints around the US so that is saying a lot. So, here it Labor Fay weekend and making again. Only a few hours left! Thank you!
Steven Pennington says
Shelly that makes me happy to read. What a great and special weekend for cooking out. I'm honored you and your family and friends were able to enjoy on Labor Day. All the best, Chef...
Shelly eichner says
It’s Shelly again. This time I am making 7 racks of ribs in two containers. It’s a bit tight but will move them around over the 48 hours. Can’t wait to share with friends.