
Cauliflower pizza crust is a game-changer in the world of healthy eating. It's a perfect blend of nutrition and flavor, offering a low-carb, gluten-free alternative to traditional pizza crusts.
⬇️ Table of Contents
Why You'll Love This Recipe
It's an ideal choice for those on a keto diet, gluten-sensitive eaters, or anyone looking to add a healthy twist to their pizza nights.
Here's a summary of why homemade cauliflower pizza dough a great choice:
Health-Conscious Choice:
- Low in Carbs: Perfect for low-carb or keto diets.
- Nutrient-Rich: Cauliflower provides essential vitamins and fiber.
- Gluten-Free: Ideal for those with gluten sensitivities or celiac disease.
Taste and Texture:
- Deliciously Crispy: Offers a crunch that competes with traditional crusts.
- Flavorful: A tasty blend of cheeses and herbs.
- Versatile Base: Suitable for a variety of cauliflower pizza toppings.
Watch How To Make

Ingredients
- 1 large head of cauliflower (cauliflower rice)
- Chia seeds (superfood addition)
- Quinoa (optional for added nutrition)
- 1 egg
- Parmesan cheese
- Italian Seasoning
- Seasonings (Italian herbs, salt, pepper, etc.)
- Parchment paper
- Butter (for parchment paper)
Gluten Free Flours
- Almond Flour - (provides a depth of flavor)
- Coconut flour (gluten-free)
How To Make Cauliflower Pizza
Spoiler Alert - You're going to love this cauliflower crust recipe a bunch
Healthy eating is popular nowadays, but who said healthy food can't taste great? We all love the great flavor and great textures in our food.
And that is exactly what we have here today.
Equipment
- Food processor
- Microwave
- Thin cloth or cheesecloth
- Baking sheet
- Mixing bowl
Homemade Cauliflower Crust Instructions
Prepare the Cauliflower
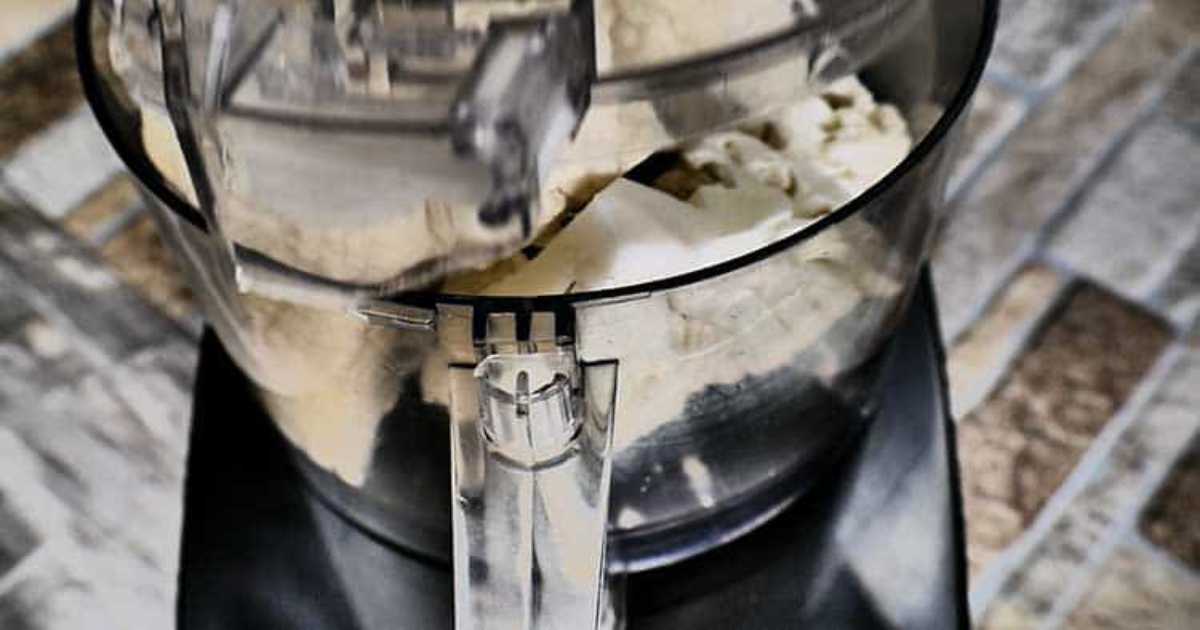
Use a food processor to pulse cauliflower florets until they reach a fine texture.
Cook the Cauliflower
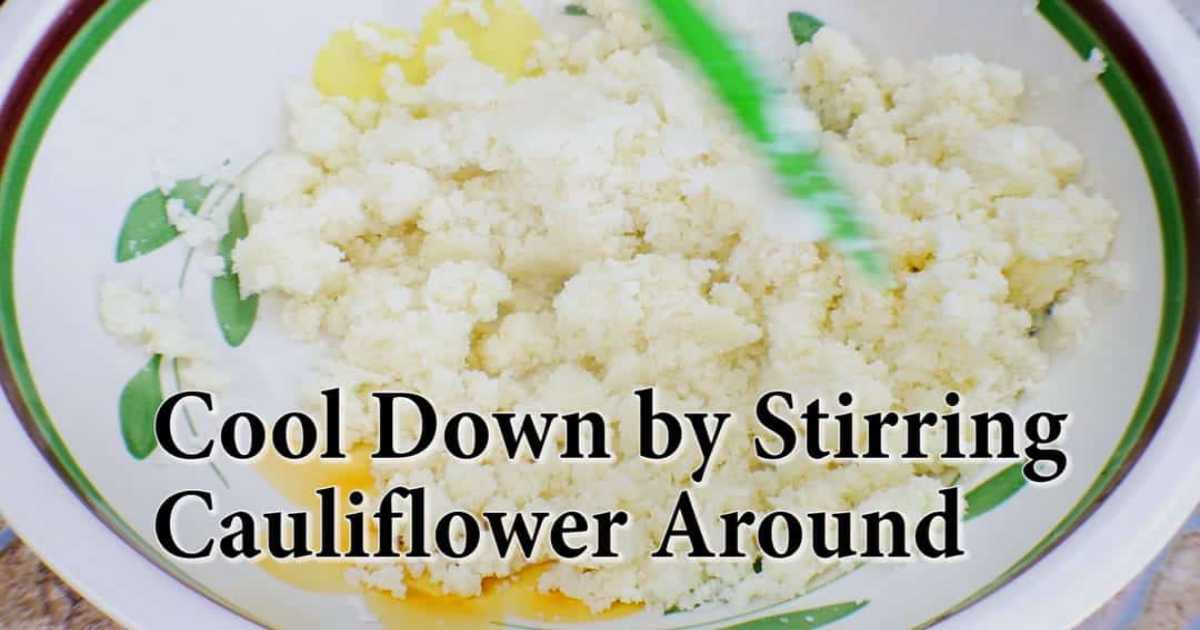
Soften the riced cauliflower in the microwave, cook for 4 minutes, then allow it to cool down. Next, you can pass it through a ricer to create cauliflower rice.
Drain the Cauliflower
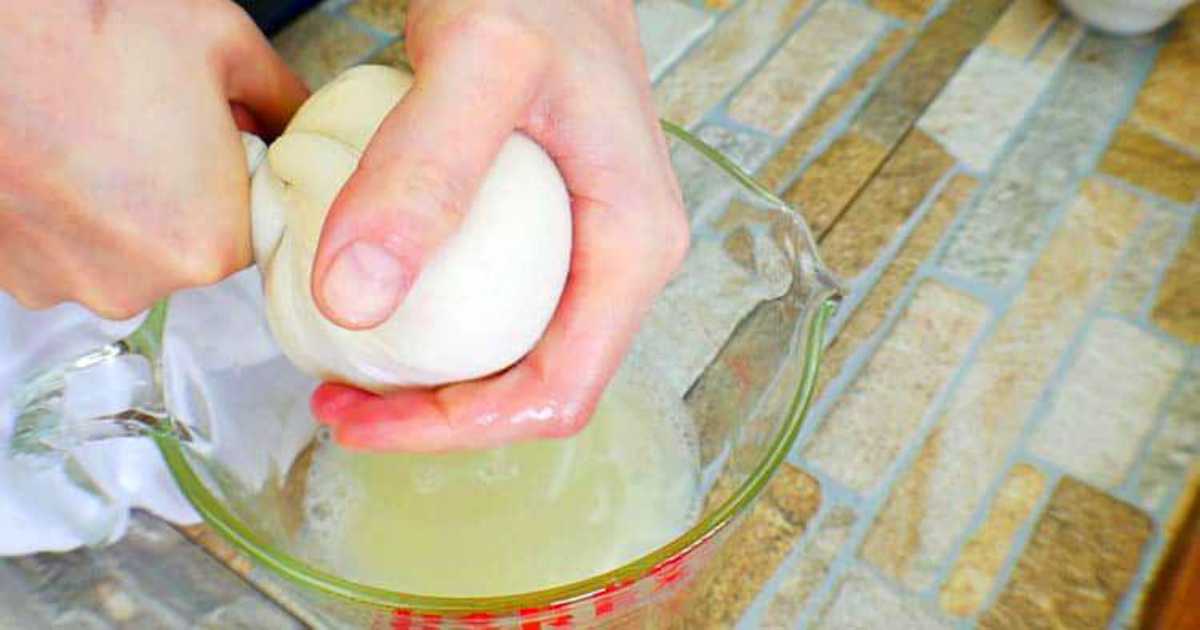
Employ a cloth or cheesecloth to thoroughly squeeze out the moisture from the cauliflower rice.
Bring the kitchen dish towel up and around the Cauliflower and squeeze out the water inside the Cauliflower. Take your time and remove as much water as you can.
The key to make cauliflower pizza crust is removing the maximum amount of water is the key to a crispy cauliflower pizza crust.
Next, add the cauliflower to a large bowl, add all crust ingredients, and mix well.
Mix the Ingredients
In a mixing bowl, blend the prepared cauliflower with chia seeds, quinoa, egg, Parmesan cheese, and your selected seasonings.
Shape the Cauliflower Pizza Crust
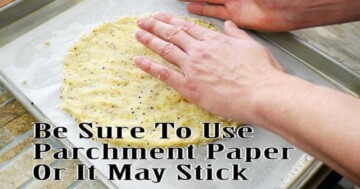
Spread and flatten the mixture onto a baking sheet lined with buttered parchment paper.

The thickness is up to you; I suggest a crust of one-half inch. The thicker you make the crust, the less crispy the result.

Par-Bake the Crust
The par-cooking time for the cauliflower pizza crust typically ranges from 15 to 20 minutes. This initial baking step is done before adding your favorite pizza toppings and is crucial for achieving a crispy texture.
Preheat your oven temperature to 400°F (approximately 204°C).
The crust should be baked until it starts turning golden brown; I suggest using a pizza stone for maximum crispiness. Note that oven temperatures can vary, so it's a good idea to keep an eye on the crust as it bakes to ensure it doesn't overcook.
Add Toppings
Customize your pizza by adding your preferred toppings, like a homemade pizza sauce and shredded cheese.
Final Baking
Continue baking the pizza until it reaches your desired level of crispiness. Golden crust is the goal, and a pizza stone is a great tool to achieve.
Toppings Ideas
Here's some cauliflower crust pizza: creations to try:
- Classic Margherita: Fresh mozzarella cheese, sliced tomatoes, and fresh basil leaves.
- Pepperoni: Sliced pepperoni, tomato sauce, and shredded mozzarella.
- Veggie Delight: Bell peppers, red onions, mushrooms, and olives.
- Hawaiian: Ham slices and pineapple chunks.
- BBQ Chicken: Cooked chicken breast with BBQ sauce, red onions, and cilantro.
- Meat Lovers: Pepperoni, sausage, bacon, and ham.
- Spinach and Feta: Baby spinach, feta cheese, and cherry tomatoes.
Vegan Cauliflower Pizza Crust
Creating a vegan version of the cauliflower pizza crust is a fantastic way to cater to plant-based dietary preferences without sacrificing flavor or texture.
Here's how you can adapt the recipe:
Vegan Cauliflower Crust Ingredients:
- Cauliflower: The base remains the same.
- Vegan Binding Agent: Instead of eggs, use a flax egg (1 tablespoon ground flaxseed mixed with 3 tablespoon water, left to thicken for a few minutes) or a commercial vegan egg replacer.
- Vegan Cheese: Opt for alternatives like cashew cheese or store-bought vegan offerings.
- Seasonings: Continue with the same herbs and spices for flavor.
What to Serve with Pizza
Pairing your cauliflower pizza with the right side dishes can turn a simple meal into a delightful feast.
Here are some appetizing options to serve alongside your pizza:
Fresh Salad
- Garden Salad: A mix of fresh greens, cherry tomatoes, cucumbers, and a light vinaigrette.
- Caesar Salad: Romaine lettuce, vegan Caesar dressing, and croutons for a classic choice.
- Arugula and Pear Salad: Arugula leaves with slices of pear, walnuts, and a balsamic glaze.
Roasted Vegetables
- Garlic Roasted Broccoli: Broccoli florets roasted with garlic and a sprinkle of sea salt.
- Balsamic Glazed Brussels Sprouts: Brussels sprouts roasted and glazed with balsamic vinegar.
- Mixed Roasted Veggies: A colorful mix of bell peppers, zucchini, and red onions.
Dipping Sauces
- Marinara Sauce: Perfect for dipping crusts.
- Garlic Aioli: A creamy and garlicky dip.
- Hummus: A healthy and flavorful option, especially good with spicy pizzas.
Soup
- Tomato Basil Soup: A classic that pairs wonderfully with any pizza.
- Minestrone Soup: A hearty vegetable soup for a more filling meal.
- Roasted Red Pepper Soup: A creamy soup with a hint of sweetness.
Appetizers
- Stuffed Mushrooms: Mushrooms stuffed with herbs and vegan cheese.
- Bruschetta: Toasted bread topped with a mixture of tomatoes, basil, and garlic.
- Vegan Mozzarella Sticks: A plant-based take on the classic appetizer
Storing Tips
Proper storage of your cauliflower pizza crust is essential to maintain its flavor and texture. Here are some effective tips for storing both the crust and the fully topped pizza:
Storing Unbaked Cauliflower Crust:
- Cool Completely: Allow the par-baked crust to cool to room temperature before storing.
- Wrap Tightly: Wrap the crust tightly in cling film or aluminum foil to protect it from freezer burn.
- Freeze: Place the wrapped crust in the freezer. It can be stored for up to 3 months.
Storing Baked Cauliflower Pizza Crust:
- Cooling: Let the leftover pizza cool completely.
- Refrigeration: Place the pizza in an airtight container. If the pizza is too large, you can wrap individual slices in cling film or aluminum foil.
- Refrigerate: Store in the refrigerator for up to 2-3 days.
What Is the Best Cauliflower to Use?
When it comes to making cauliflower pizza crust, the type of cauliflower you choose can impact both the texture and ease of preparation.
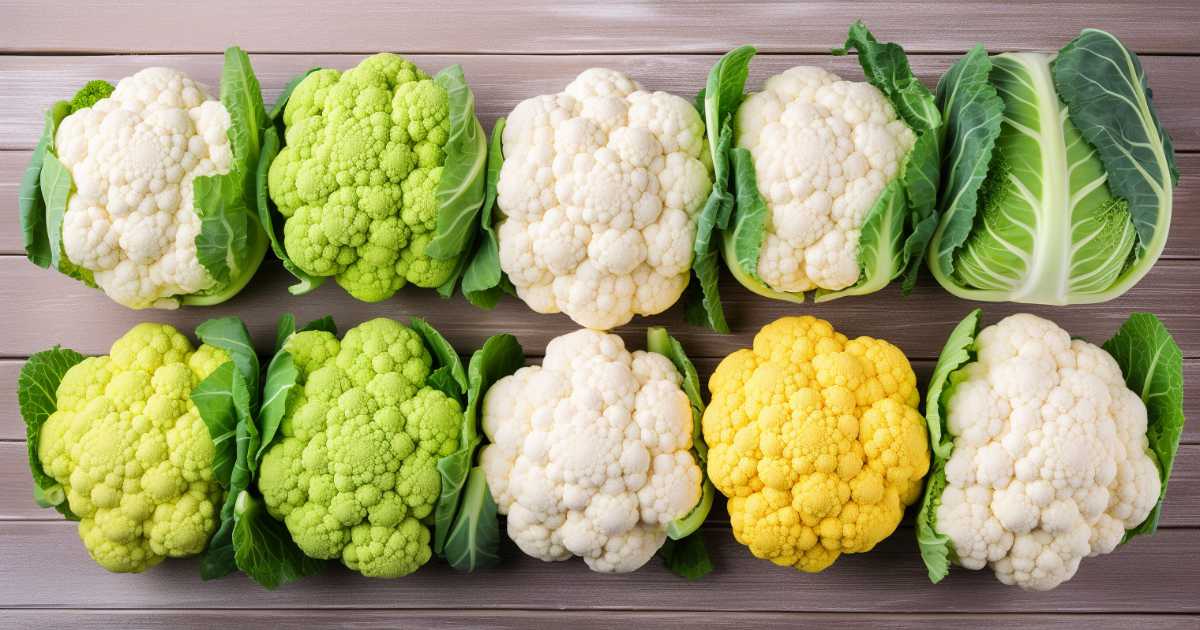
Here are the options and their benefits:
Fresh Cauliflower
- Texture and Flavor: Fresh cauliflower tends to offer the best texture and flavor. It provides a natural, earthy taste that's hard to beat.
- Preparation: Requires washing, cutting into florets, and ricing in a food processor. It's a bit more labor-intensive but worth the effort for the fresh taste.
- Availability: Widely available in most grocery stores.
Frozen Cauliflower Florets
- Convenience: These are a great time-saver as they're already cleaned and cut.
- Texture: Once thawed and drained, they can closely mimic the texture of fresh cauliflower.
- Consideration: Ensure they're thoroughly thawed, and excess water is squeezed out to avoid a soggy crust.
Pre-Riced Cauliflower (Fresh or Frozen)
- Ultimate Convenience: Cauliflower rice, available both fresh and frozen, saves time and effort in preparation.
- Consistency: Offers a consistent, fine texture that's ideal for crust making.
- Moisture Content: Especially with frozen varieties, drain and dry it well to eliminate excess moisture.
📖 Recipe

Cauliflower Pizza Crust Recipe
Ingredients
- 1 head Cauliflower
- 1 ¼ cups Parmesan Cheese Grated
- 1 whole Egg
- 1 teaspoon Chia Seeds Hydrated
- 2 Tbs Cooked Quinoa
- ½ teaspoon Garlic Powder
- ½ teaspoon Dry Oregano
- ½ teaspoon Sea Salt
- ⅛ teaspoon Black Pepper
Toppings
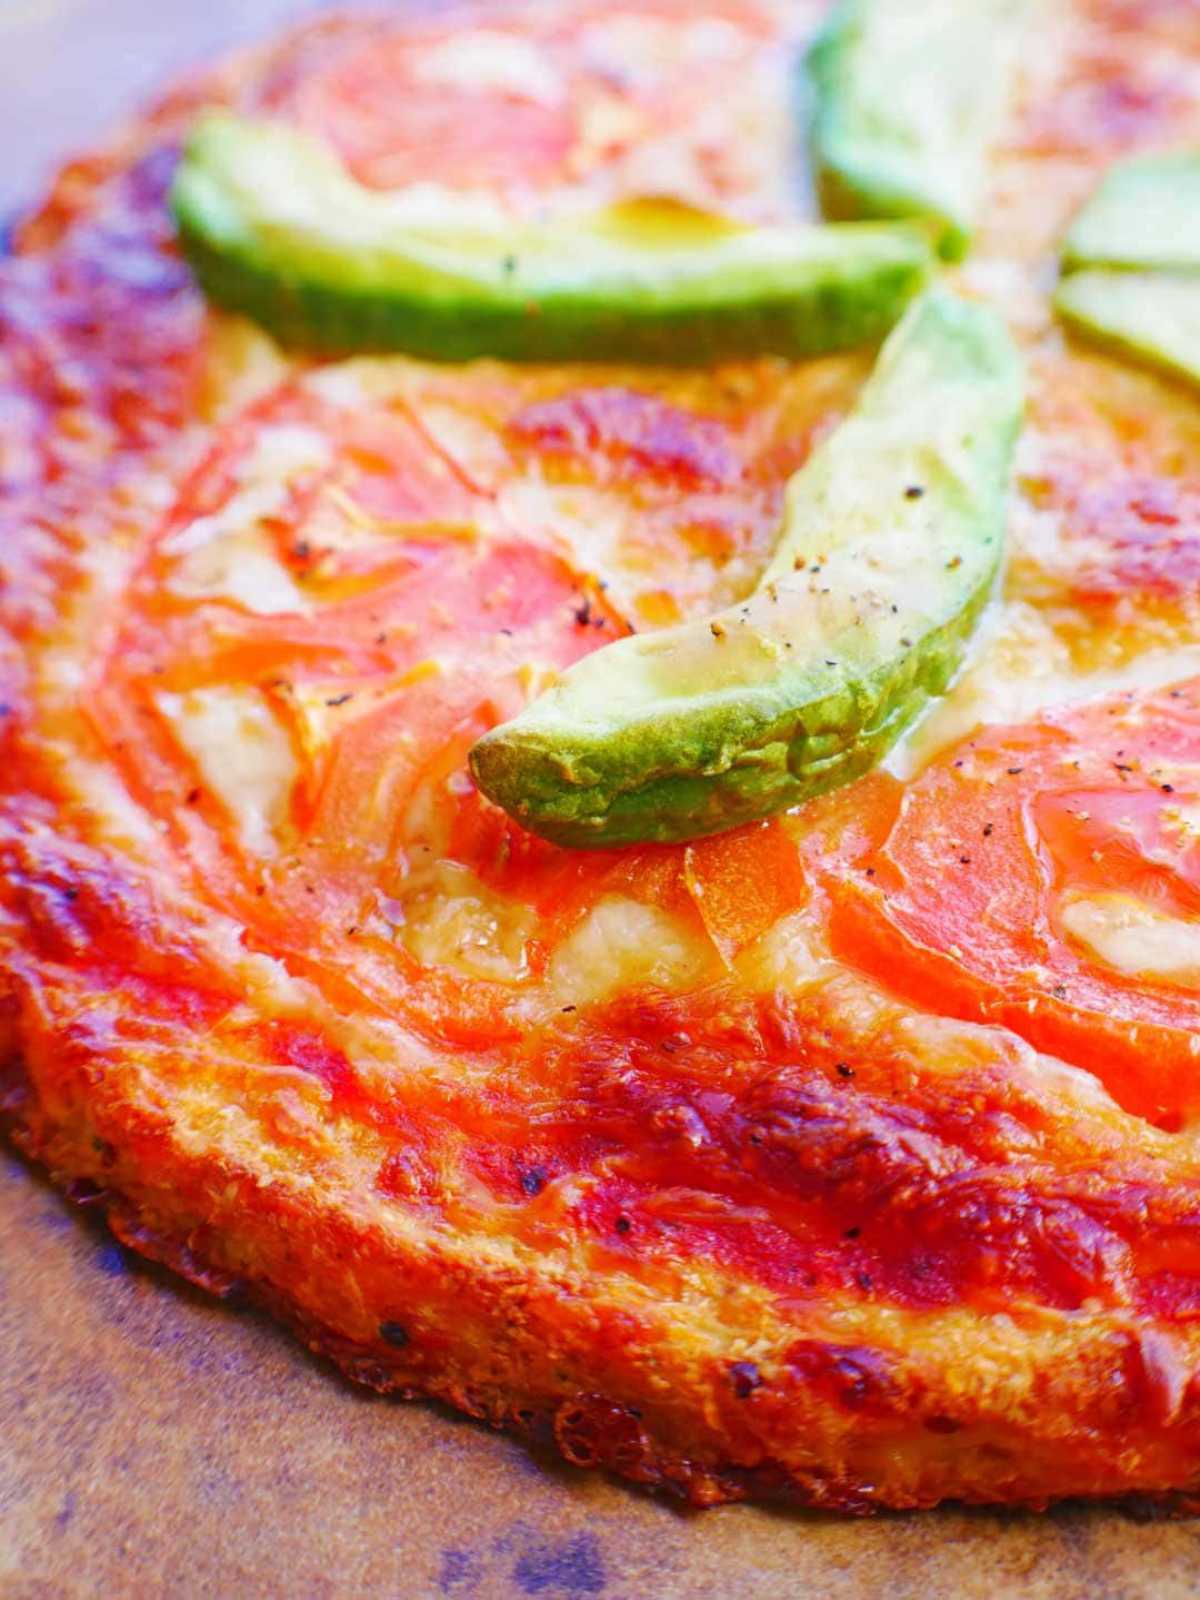
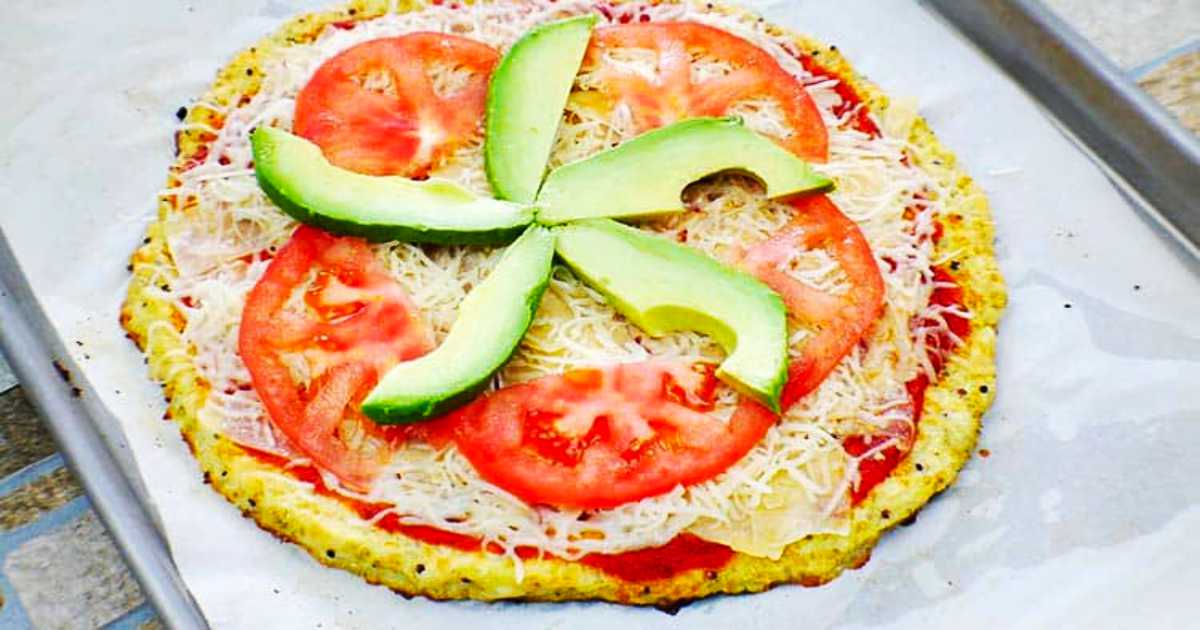
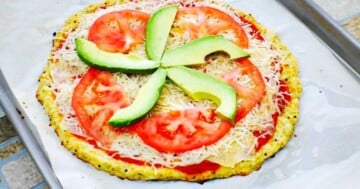
- ½ cup Tomato Sauce
- 6 slices Mozzarella Or favorite cheese
- 5 slices Avocado
- 6 slices Fresh Tomato
Instructions
Making The Cauliflower Crust
- In a Food Processor add cut up Cauliflower and pulse till the texture of snow ( Fine Grind )Next, Microwave the Cauliflower for 4 minutes. Then, allow the Cauliflower to cool down so that you can handle the Cauliflower. Then, add a kitchen towel to a large mixing bowl and place the Cauliflower in the middle. Bring the kitchen towel up and around the Cauliflower and begin to squeeze out the water from inside the Cauliflower. Take your time and remove as much water as you can. This is the key to a crispy pizza crust. Add the Cauliflower to a mixing bowl, add the crust ingredients, and mix well.


Shaping the Pizza Crust
- Prepare the Baking Sheet: Line an oven-safe cookie sheet with parchment paper. For added adherence, lightly spread a thin layer of butter on the cookie sheet before placing the parchment paper. This helps the paper stay in place during the shaping process.Shape the Crust:Transfer the cauliflower mixture onto the center of the parchment-lined cookie sheet. Begin by forming a circle with the mixture. Gently press down and evenly spread the cauliflower outwards, shaping it into a large circle. Aim for uniform thickness to ensure even cooking. The diameter and thickness of your crust can be adjusted according to your preference, but a half-inch thickness is generally recommended for optimal crispiness.As you shape the crust, focus on creating the desired outline for your pizza, keeping the edges slightly thicker to mimic a traditional pizza crust's rim.
Par Baking The Crust.....
- Preheat the Oven:Ensure your oven is preheated to 400°F (204°C). A properly heated oven is crucial for achieving the right texture.Par-Bake the Crust:Carefully place the shaped cauliflower pizza crust in the preheated oven.Bake it for 15 minutes without any toppings. This initial baking, known as par-baking, is essential to firm up the crust and start developing a crispy texture.Monitor the Crust:Keep an eye on the crust during this phase. Look for the crust to begin turning a light golden brown, indicating it's getting crispy.
Finishing The Pizza
- Add Toppings Post Par-Baking:Once the 15-minute par-baking is complete, remove the crust from the oven. Now's the time to unleash your creativity with toppings. Evenly distribute your chosen sauce, cheese, and other toppings over the crust. Remember, a balanced amount of toppings ensures even cooking.Return to Oven for Final Baking:Place the topped cauliflower pizza crust back into the oven. Bake for an additional 20 minutes or more, depending on your preference for crispiness.Check for Desired Crispiness:The key to a perfectly crispy crust is in this final baking stage. Monitor the pizza as it bakes, checking for the crust to achieve a golden-brown hue and the toppings to be cooked to perfection. The longer the crust bakes, the crispier it will become, so adjust the time based on how crispy you like your pizza.
Notes
Maximizing Flavor and Texture
- Seasoning the Crust: Don't hesitate to add a personal touch with seasonings. A dash of garlic powder, onion powder, or even a sprinkle of red pepper flakes can elevate the flavor.
- Thickness Matters: For a crispier crust, aim for a thinner spread. If you prefer a chewier texture, go slightly thicker.
Toppings Tips
- Balance is Key: Overloading with toppings can make the crust soggy. Opt for a moderate amount to maintain the crust's integrity.
- Pre-Cook Certain Toppings: Ingredients like raw sausage or vegetables with high water content should be pre-cooked to avoid moisture seeping into the crust.
Reheating
- Oven Reheat: To retain the crust's crispiness, reheat leftovers in the oven rather than the microwave.
Freezing and Storing
- Freeze for Later: Par-baked crusts can be frozen for a quick pizza base in the future. Just add toppings and bake directly from frozen.
- Storage Life: In the fridge, the baked pizza keeps well for up to 2-3 days in an airtight container.


Leave a Reply