
Learning how to truss a chicken will improve the overall quality of your roasted chicken. Trussing creates even cooking, plus there's something about beautifully presented roasted chicken.
Golden brown with crispy skin all around and super moist doneness. Trussing a chicken takes on average 20 seconds to complete.

⬇️ Table of Contents
Step By Step Instructions
Step 1: Rinse the chicken off with cold water. Then, pat dry with a paper towel.
Step 2: Season the inside of the chicken with salt + pepper. If adding items like onion, garlic, lemons, herbs & spices, you should add them at this point.
Step 3: Cut a piece of trussing string longer than you think. Cut it too short; you'll have to start over. (Trussing spring Amazon link in the recipe card below)
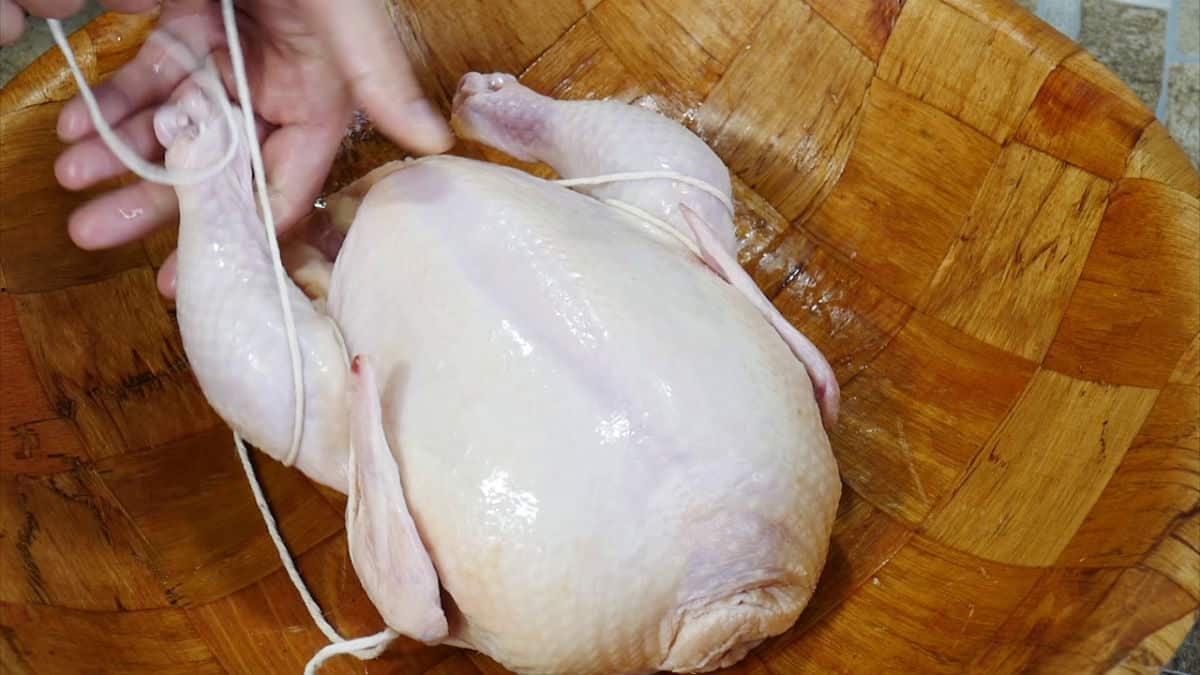
Step 4: Place the trussing string underneath the chicken. Line up with the chicken wing.

Step 5: Move the string forward over the front of the chicken wings, making a loop back underneath the wings and back to the starting position.


Step 6: Image Below: Begin by moving the trussing string over the top of the chicken legs. Wrap the string underneath the legs, making a complete loop back to the starting position. You might need to manually move the trussing string into place around the legs.
Secure the string around the legs by moving the string with your fingers close to the chicken.
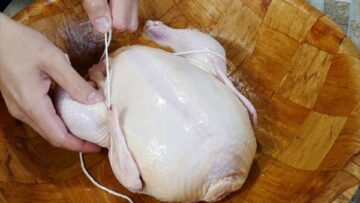
Step 7: Finish by bringing the trussing string ends together, as seen in the photo below. Make a knot and secure the trussing string right underneath the breastbone. This step follows right after getting the trussing string in place around both legs.

For the Butcher/Chef knot, please watch the short video attached to the recipe card below.
See where the trussing string comes to rest/finish? Tie a knot there and cut the string shorter.

Using a second piece of trussing string, tie the legs together
- Take the new piece of string around the first leg and tie a knot
- Then, connect the string over to the second leg and take the string around the second leg
- Finish by tying a second knot to secure
Side view of completed trussed chicken
Video: Watch How To Truss a Chicken

The Right Tools for Trussing Chicken
When it comes to trussing a chicken, the adage "the right tool for the right job" couldn't be more apt. It's not just about keeping the bird's limbs neatly tucked; it's about ensuring the perfect roast. Here's why selecting the proper materials is a pivotal step in your culinary journey:
Butcher's Twine
Often overlooked, butcher's twine is the silent champion of trussing. This sturdy, heat-resistant string is essential for keeping your chicken in the desired shape during cooking. Unlike synthetic strings or materials, butcher's twine won't melt or impart unwanted flavors into your beautifully roasted chicken.
Trussing Needle
If you're feeling particularly adventurous, a trussing needle can elevate your trussing technique. This long, sturdy needle can help you secure stuffing inside the cavity or expertly lace up your chicken, ensuring that every part cooks evenly and stays moist.
Kitchen Scissors
A pair of sharp kitchen scissors is a must-have for any trussing task. Whether you're snipping away excess fat or cutting the twine to just the right length, scissors offer precision and ease that a regular knife simply can't match.
📖 Recipe

How To Truss a Chicken
Suggested Equipment
Ingredients
- 1 Chicken Patted Dry
Instructions
Step 1: Chicken Preparation
- Salt & pepper the inside of the chicken before trussing. You will also want to add any ingredients to the chicken cavern now. Items like onion, garlic, lemon, thyme, rosemary...
- Cut a piece of trussing string. Make sure it is long enough, 2 ½ to 3 ft will work.
Step 2: Trussing The Chicken
- Lay the rinsed and patted dry chicken in front of you with the legs pointed at you
- Place the trussing string under the chicken, by the wings

- Loop the trussing string over the top of the wings to the front of the chicken, then back under to complete the loop
- Next, take the trussing string and come over the top of the legs
- Now loop back under the legs and back to the top of the legs.
- The trussing string is now at the backside of the chicken
- Tie a chefs knot, or any knot that works ( How to tie a chefs knot is in the video)
- Secure tightly, the chicken will shape up and look picture perfect for your roasts
- Tie the legs together with string if desired


Video
Notes
- Trussing creates and allows more of the chicken skin to be exposed to the heat while cooking. This will give you the best presentation and more even browned skin.
- Golden browned chicken skin requires that the chicken be patted very dry before cooking. Moisture on the skin will lead to steaming, not browning.
- You can truss a turkey with the same method.
- Adding items like lemons or onion into the chicken cavity, please do before trussing, or the items will not fit in the opening after tightening the trussing string.
Chicken Recipes To Try
Learn to Truss and Tie a Butcher's Knot For "Roasts."

Our Ultimate Chicken Learning Kit


Leave a Reply